Kindred Stamps March Release: Tune In
As a kid, you couldn’t wait to watch your cartoons. Be it after school, or Saturday morning. You would tune in onto one of the 5 channels you got on the farmer antenna and just stare at the tv for hours engrossed in the spectacles in front of you. When I saw the Tune In stamp set in the Kindred Release, I knew I needed this set!! Let me take you back to your childhood with these cards that harness the magic of times gone by and the age of innocence… and spy’s…
This blog utilizes affiliate links for the products that I utilized. By clicking on the links, you are supporting me without any cost to you. I thank you for your support if you choose to utilize the links provided. Let’s Tune In…

Tune In, Kindred Stamps
Project One: Magician Wanna Be
Watch me…. Make some magic with the Tune In set! This wanna be magician and his assistant want to let the recipient know that I’ll always be there.
Let’s start on the back drop. The back curtain was up first. Pulling out a deep blue card stock, some embossing ink, gold Perfect Pearls and the stars from the Pixie Dust stamp set I was ready to make the backdrop. The stars were stamped with embossing ink in a semi-random pattern and dusted with gold Perfect Pearls.
Using the Curtain Die (now retired- sorry), I die cut the components and inked them up with Altenew Persian Blue and Antique Gold inks. These were set aside to dry completely. The table was up next! I took a piece of scrap white paper and cut out a simple arched pattern. The tabletop was inked up with Distress Ink Lumberjack Plaid and set aside to dry. To make the base of the table, I dug in the scrap pile and pulled out a thin black strip to use as the pole. Look at me using up some of the paper scraps that I refuse to throw away… I know, you have them too…. Using some teeny tiny flat backed glass sequins I added the bling to the bottom of the tabletop. So sparkly.
Time to pull out some stamps and get to coloring. The Moose and Squirrel were colored with Olo Markers (See Color Guide), fussy cut out, and set aside. The sentiment was stamped in a deep blue color to match the deep blue background and matted with the same deep blue card stock as utilized on the backdrop. Finally, I needed a hat for the Squirrel to be pull out of. Digging my in stash, I pulled out Triple The Trouble stamp set and stamped the head and hat of the uncle. To make the hat, I fussy cut the shape of the hat and colored the hat in Olo Markers (CG9/ CG7/ CG5). To make an opening I pulled out my trusty craft knife and cut an arched slit large enough for the feet of the Squirrel to fit.
With all the piece ready to go, I was ready to assemble. The curtain was assembled with the middle curtain popped up with some foam onto the deep blue backdrop. This was adhered to an A2 card base. To make my life easier, I assembled all the piece of the table first. The Squirrel was tucked into the hat and glued on the toes and where the body overlapped the hat. The hat was then glued to the table. The post of the table was attached to the table top, leaving overhang to cut after I determine the height needed. This entire piece was then covered in foam tape. With all the piece ready, I stuck down the pieces and trimmed the table post length. With the tail end of the post cut off, I converted that into post base. I just love the luster of the gold stars behind the magician and his assistant. Maybe some day they will find the rabbit.
Card Size: A2 (4.25 inches by 5.5 inches)

Tune In, Kindred Stamps
Project Two: Tune In D’Bomb
Boom! The Tune In set is definitely d’bomb!! This simple grid layout is brought to life by having the respective teams on their own bombs.
The images were stamped in alcohol safe ink and colored with Olo Markers. They were then fussy cut out and a little foam tape was placed on their back. The sentiment was stamped with embossing ink and heat embossed with Snowfall Embossing Powder. The sentiment was matted with a thin boarder on a scrap piece of yellow paper. Knowing that I wanted the characters to sit on bombs, I die cut circles with a circle die. Then digging into the scrap pile, I pulled out some black that I could use as the neck. Finally, I grabbed a scrap of white stock cut thinly as the wicks and colored them with Olo Marker Y2.3. The bombs were assembled and set aside.
For the background, I pulled out the Vigilante Justice paper pack and searched for the gradient black polkadot paper. This was cut down with an A7 nesting die to provide the base for my little bombs to sit on.
To assemble the card, the pattern paper panel was centered onto the card base. The bombs were adhered in a grid layout flat to the card base. Using a sparkly pen, I added a little glitz to the wicks of the bombs. The sentiment was centered in-between the bombs. The foam backed characters placed onto their respective bombs and BOOM! It’s d’bomb!!
Card Size: A7 (5 inches by 7 inches)

Tune In, Kindred Stamps
Project Three: I Spy
With a trusty magnifying glass you can spy many things, including a great friend! This card showcases the two spy’s in the Tune In stamp set doing what they do best… spying!
The shaker element was the first thing to be constructed. To make the base and frames for the magnifying glass I pulled out the Nested Circles Dies (from a previous kit), or you can utilize any nesting circle die that you can make a base and a frame from. A shaker base was cut out of blue card stock, a piece of acetate was cut with the same die. Then I cut multiple black frames. I choose to cut out multiple frames for my shaker element because I wanted to have the same solid color appearance as you would see on a magnifying glass vs. foam tape that would not match exactly on the edge.
I stamped the sentiment on the blue card stock circle. To mimic the jagged lettering that would be on a secret code I intentional double-stamped the image with a small shift. Funny how you do it on accident all the time, and when you intentionally try to do it, it takes 3 attempts (insert eye roll). After I finally got the shifted text I was desiring, I started building the frame wells by stacking the frames with liquid glue. These stacked frames were allowed to dry completely.
I wanted the shaker element to have some bling when it was propped up for display so I adhered some micro glass flat back rhinestones to the blue card base. This again was allowed to dry completely. To fill the shaker, I pulled out small gold discs. Once I was satisfied with fill, I adhered the acetate circle with glue and then the remaining black frame. The handle was a piece of scrap black paper. I adhered this to the back of the shaker packet leaving a long tail. This will be applied flat and cut down prior to assembly.
The Spy Man and Spy Woman were colored with Olo Markers (See Color Guide), fussy cut out, and foam tape applied to their backside. Next up was the card base and background. I pulled out a top folding A2 card base and adhered a A2 black card stock panel to the card base. The Spooky Hotel Paper Pack provided the linear paper look I was going for. The paper was cut down to allow a wider framed appearance.
The magnifying glass shaker was glued to the Spooky Hotel pattern paper and the handle was trimmed down to be flush with the paper edge. The patterned paper was then applied to the prepared card base. The spy’s were placed on either side of the handle. Finally, I added a few more micro rhinestones across the card front to add a little bling and light catching clues.
Card Size: A2 (4.25 inches by 5.5 inches)
Tune In, Kindred Stamps
Project Four: Most Wanted
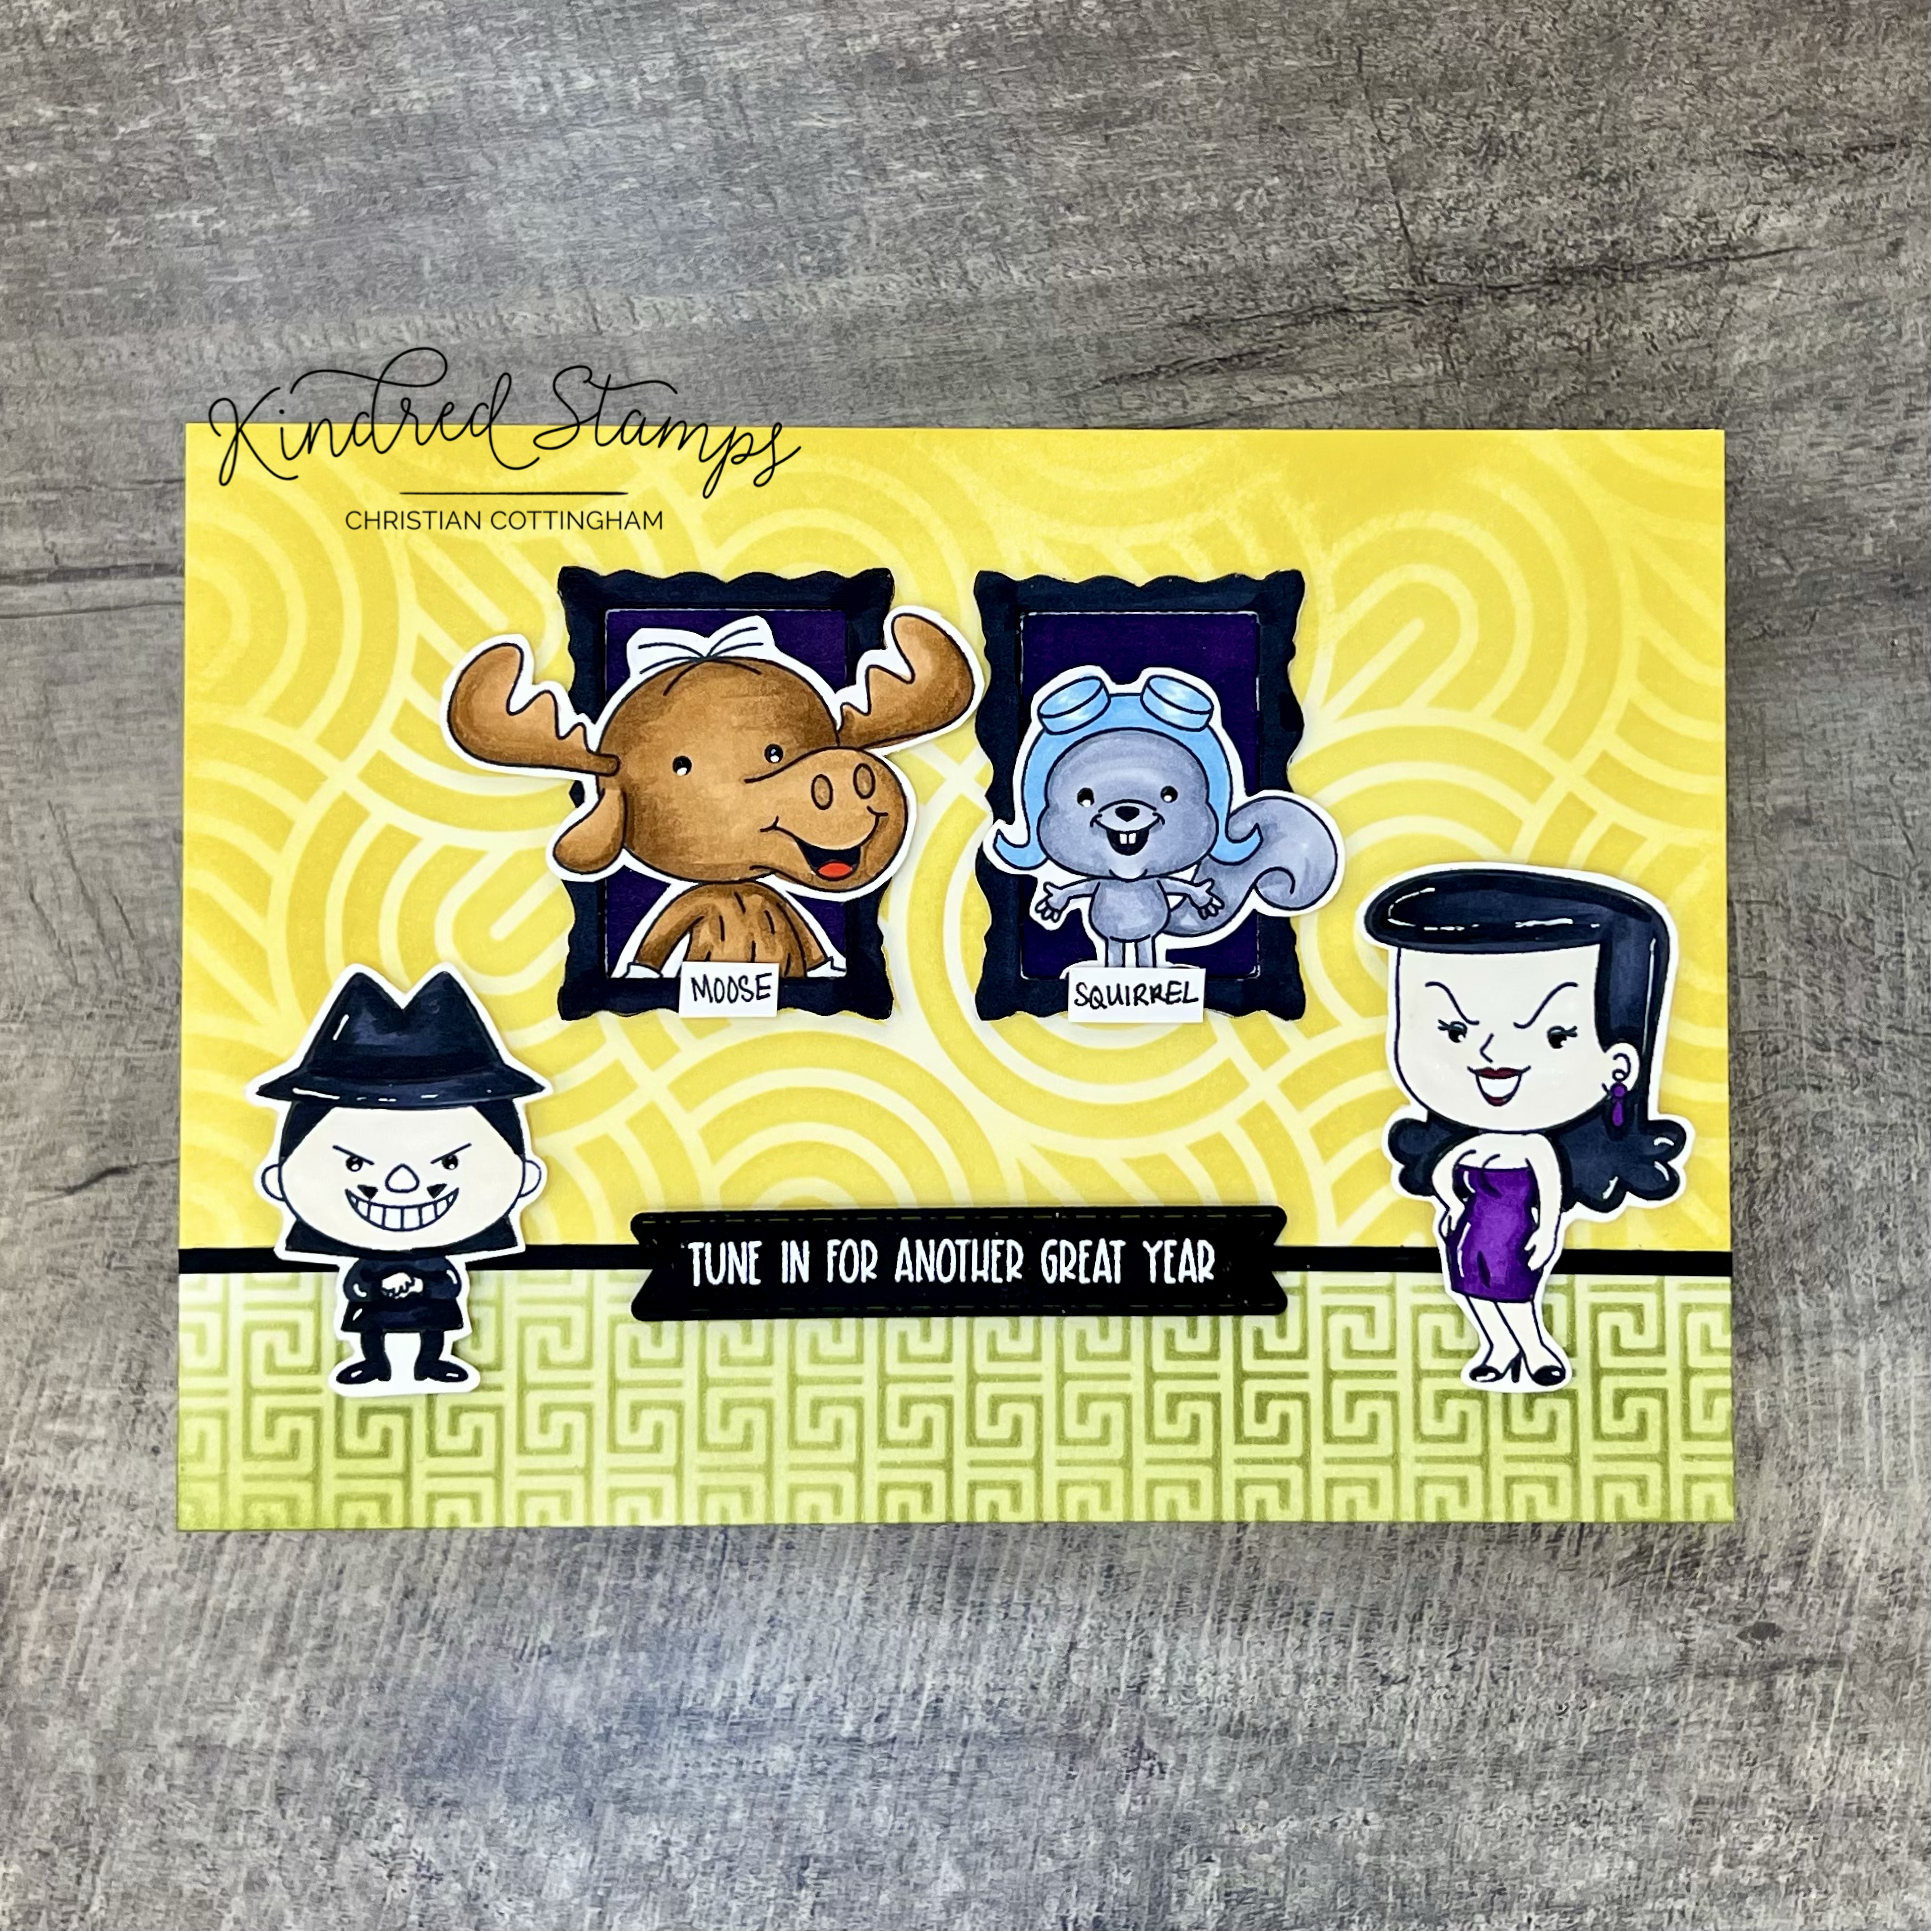
The hidden spy lair is the perfect place to plot out how to catch your arch nemisis. In this retro inspired lair, the spy agents and their targets can be seen. You can hear them plotting their next steps. Tune In and let’s breakdown their room.
This liar is one of grandeur, so I knew the card needed to be an A7 (5 inches x 7 inches). A piece of card stock was cut to 5x7 inches. I masked off the bottom portion of the card stock. The top portion of the scene was stenciled with the Waves Stencil in a deep yellow ink. When the stencil was removed, I ink blended over the entire stenciled section from the outside edges to the center allowing the color to be deeper around the edges and lighter in the center. I repeated the same process for the floor (masked the top; stenciled; blended over the top) with an olive toned ink utilizing the Greek Tiles stencil (retired). To separate the floor from the wall, a thin strip of black card stock was glued down.
Now every spy lair needs to have their arch nemesis photo available to stew in front of. Pulling out the Art Frames dies, I die cut the frame twice and background once out of white card stock. The frames were colored with the BK Olo Marker while the background was colored with V2.7 Olo Marker (same color as the deepest color in Spy Woman’s dress). The Moose, Squirrel, Spy Woman and Spy Man were colored with Olo Markers and fussy cut out (See Color Guide).
To assemble the frames, I stacked and glued the frames. The Moose and Squirrel were inserted into the frames and glued at the base and on the edge of the frame if needed to give the illusion that they were popping out of the frame. The extending body parts were trimmed off. A thin foam square was placed behind the heads of each to support them when the frame background was adhered.
With the frames assembled, the most wanted pictures needed to identify the arch nemesis so I just wrote Moose and Squirrel on a piece of white cards and trimmed it down to label the frames. Pulling out the Sentiment Strips Die I cut out a black sentiment strip. The sentiment was stamped with embossing ink and heat embossed with Snowfall Embossing Powder.
Finally, all the pieces were ready to make the lair of grandeur. The frames were positioned in the center of the 5x7 stenciled panel. The Spy’s were popped up with some foam tape so they were in the foreground of the scene. Finally, the sentiment was centered on the baseboard. The scene was glued to an A7 card base. Any spy would love a lair this colorful and moody!
Card Size: A7 (5 inches by 7 inches)
The entire Kindred Stamps release will be available this Friday at 8am PST/11am EST. Be sure to subscribe to the Kindred Stamps blog to see a daily line up of sneak peeks from our amazing Design Team! Come join the Fan Club and release event to be part of the release fun, and you may just win some Kindred Stamps credit!!
Color Guide: Olo Markers
Moose>
Body> OR3.7/ OR3.4
Gloves> CG1
Tongue> RO.5
Squirrel>
Body> CG5/ CG3
Nose/ Mouth> BK
Helmet> B0.3; B2.0 (glass only)
Spy Man>
Flesh> OR2.0
Jacket> CG9/ CG 7
Mustache> BK
Hair/ Pants> K
Hat> K/ CG9/ CG7
Spy Woman>
Flesh> OR2.0
Eyeshadow> B0.3
Lips> R5.7
Dress> V2.7/ 2.6
Hair> CG9/ CG7
Shoes> CG9